It’s a common scenario: You need power, but your trusty generator won’t start. Did you know a defective spark plug or clogged carburetor could potentially be the cause? This article will walk you through simple troubleshooting steps to help revive your silent machine and get it humming again.
So, let’s dive in and illuminate this issue!
Key Takeaways
- Checking the fuel level and ensuring the fuel valve is open can help troubleshoot a generator that won’t start.
- Inspecting and cleaning the carburetor can remove blockages that may be preventing fuel flow to the engine.
- Testing the battery’s voltage and checking its connections is important when troubleshooting a generator that won’t start.
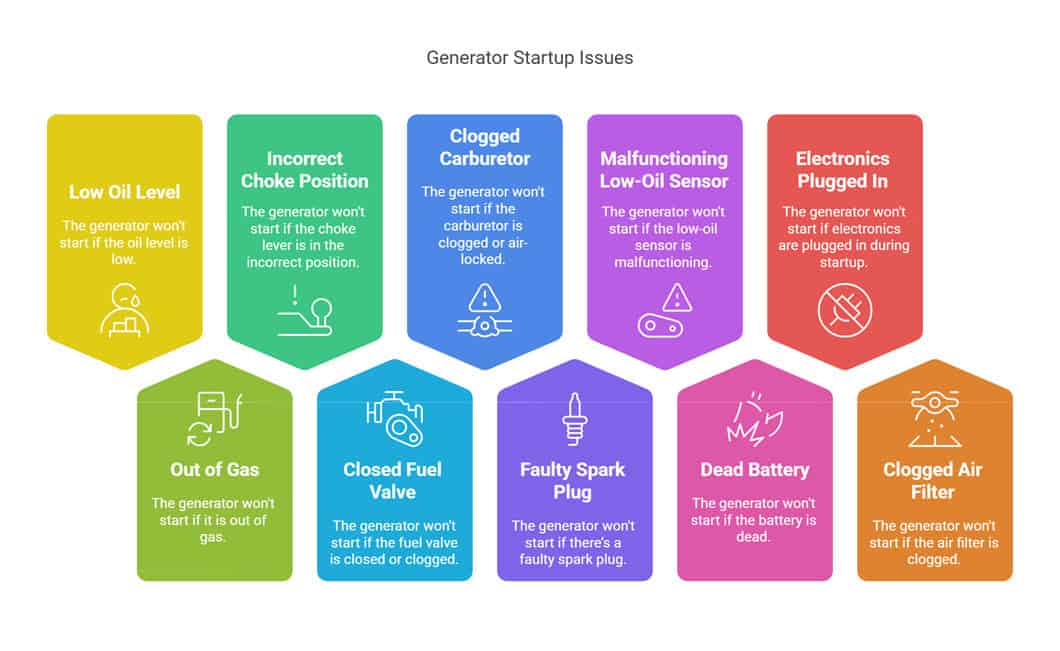
Common Reasons Your Generator Won’t Start
Your generator won’t start if the oil level is low, you’re out of gas, the choke lever is in the incorrect position, the fuel valve is closed or clogged, the carburetor is clogged or air-locked, there’s a faulty spark plug, the low-oil sensor is malfunctioning, the battery is dead, electronics are plugged in during startup, or if the air filter is clogged.
If you don’t want to have to deal with these issues, your best bet is to get the legendary quality of a Honda Generator.
Low oil level
A low oil level can be a major roadblock for your generator. This is because most generators have an automatic shut-off feature that kicks in when the oil levels dip below safety limits.
The feature protects the engine from potential damage caused by running without enough oil, which lubricates its moving parts and keeps it cool. Therefore, if you find it difficult to start your generator, check the oil gauge first to see if there’s enough fluid.
If not, refill it per manufacturer recommendations before running your generator again.
Out of gas
Running out of gas is a familiar scenario for most generator users. Your engine needs fuel to operate, but sometimes, you forget to refill the tank or underestimate how much power your activities will consume.
Under such circumstances, your generator gas tank could be dry and unable to supply the needed fuel, causing it not to start.
Knowing the fuel level in your generator is crucial at all times. Always maintain an ample amount of gas in your tank for emergencies. You can easily check this by looking inside or using a stick to measure the depth.
A lack of proper fuel flow from your gas tank might also result in difficulties when trying to start your generator. Ensure there are no clogs or leaks in the lines carrying fuel from the reservoir to the carburetor.
Incorrect choke lever position
The choke lever plays a crucial role in starting your generator. If it’s not positioned correctly, your generator might struggle to start or won’t run at all. Setting the choke lever pushes more air into the carburetor and enriches the fuel-air mixture required for ignition.
This action is especially crucial when starting a cold engine. However, leaving it open once the engine heats up could flood the spark plug with fuel and prevent proper operation. Hence, knowing how to adjust this simple yet important component can be key to ensuring the smooth running of your generator.
To correct an incorrect choke lever position, move the lever towards ‘Start’ or ‘Run.’ Keep track of its condition as part of your regular maintenance routine!
Closed or clogged fuel valve
A closed or clogged fuel valve can prevent your generator from starting. The fuel valve allows fuel flow into the carburetor, where it mixes with air to create combustion.
If the fuel valve is closed or blocked, no fuel will be able to reach the engine, resulting in a failure to start. To troubleshoot this issue, check that the fuel valve is fully open and not obstructed by debris.
Clean any clogs from the valve using a brush or compressed air if necessary. By ensuring that your fuel valve is open and blockage-free, you can increase the chances of getting your generator up and running smoothly again.
Clogged or air-locked carburetor
A clogged or air-locked carburetor can prevent your generator from starting. When the carburetor becomes clogged with dirt, debris, or old fuel residue, it restricts the flow of gasoline into the engine.
This lack of fuel can cause the generator to sputter or not start. Additionally, if air gets trapped in the carburetor, it disrupts the proper mixture of air and fuel needed for combustion.
To fix this issue, you must thoroughly inspect and clean the carburetor. Make sure to remove any blockages and ensure that all passages are clear for optimal fuel flow. Addressing a clogged or air-locked carburetor increases your chances of successfully starting your generator and keeping it running smoothly.
Faulty spark plug
A faulty spark plug can be a common reason your gas-powered generator won’t start. The spark plug ignites the fuel and air mixture inside the engine cylinder, creating the necessary combustion for the generator to run.
If the spark plug is damaged or worn out, it may not produce a strong enough spark to ignite the fuel. This can result in a lack of power and prevent your generator from starting properly.
To fix this issue, you must replace the faulty spark plug with a new one compatible with your generator model. By doing so, you can ensure that your generator has a reliable ignition source and increase its chances of starting successfully.
Malfunctioning low-oil sensor
If your generator doesn’t start, a malfunctioning low-oil sensor could be the culprit. This sensor is designed to shut off the generator if it detects a low oil level in the engine. However, suppose the sensor is faulty or not working properly. In that case, it can prevent the generator from starting even when enough oil is present.
To troubleshoot this issue, you may need to replace or repair the low-oil sensor so your generator can function as intended.
Dead battery
A dead battery is one of the common reasons why a generator won’t start. If your generator isn’t responding when you try to turn it on, it’s worth checking the battery first. A dead battery can prevent the generator from starting or cause it to start and then shut off quickly.
To troubleshoot this issue, test the battery using a multimeter or try jump-starting it with another battery. Remember to take safety precautions when working with batteries, such as wearing gloves and safety glasses.
Electronics plugged in during startup
Plugging in electronics during startup can prevent your generator from starting. The power drawn from these devices can overload the generator, causing it to stall or not start.
It’s important to unplug any appliances or tools before attempting to start the generator. Removing this extra load’ll give your generator a better chance of starting successfully and running smoothly.
Remember that it’s always best to prioritize powering essential items over non-essential electronics when using a generator.
See our Understanding Generator Wattage and Sizing for more information.
Clogged air filter
A clogged air filter can cause your generator to not start. When the air filter becomes filled with dirt and debris, it restricts airflow to the engine, making it difficult for fuel to ignite properly.
This can result in a weak or no spark, causing the generator to fail to start. You will need to clean or replace the air filter to fix this issue. Regular air filter maintenance is important for ensuring optimal performance and longevity of your generator.
Fuel System Issues
Stale or contaminated fuel ranks among the top reasons generators fail to start. Gasoline begins breaking down within 30 days, forming sticky deposits that clog carburetors and fuel lines. Signs of fuel problems include:
Symptoms of Bad Fuel:
- Strong gasoline smell but the generator won’t turn over
- Engine sputters, then dies
- White or brown residue in the fuel tank
- Rough running whenthe generator does start


 WEN 3600-Watt Portable Inverter Generator,…
 Portable Power Station Bank 300W Rated(600W Peak),…
Weather-Related Starting Problems
Cold weather particularly affects generator starting. When temperatures drop below 40°F, fuel vaporizes less effectively and oil thickens. Consider these cold-weather starting techniques:
Cold Weather Starting Protocol:
- Allow the generator to warm up 5-10 minutes before connecting loads
- Use winter-grade oil (5W-30)
- Keep the battery fully charged
- Store in a sheltered location when possible
Troubleshooting Steps to Fix a Generator That Won’t Start
To fix a generator that won’t start, follow these troubleshooting steps and get your generator up and running in no time. Find out how to check the fuel level, clean the carburetor, test the battery, and more.
Read on for all the tips you need to know.
Check fuel level and valve
To troubleshoot why your generator won’t start, you should first check the fuel level and valve. Ensure enough fuel is in the tank for it to run properly. Also, ensure the fuel valve is open and allows fuel to flow to the engine.
This step is important because a low or empty fuel tank or a closed or clogged fuel valve can prevent your generator from starting. By checking these two things, you can rule out any issues related to fuel supply and move on with troubleshooting other possible causes.
Inspect and clean the carburetor
To troubleshoot a generator that won’t start, inspecting and cleaning the carburetor is important. A clogged or air-locked carburetor can prevent fuel from reaching the engine, causing startup issues.
Removing the carburetor and cleaning it thoroughly removes any dirt or debris blocking the fuel passage. This will ensure proper fuel flow and increase the chances of your generator starting successfully.
Test the battery
To troubleshoot a generator that won’t start, it’s important to test the battery. A dead or low battery can prevent the generator from starting up properly. To check the battery, you can use a multimeter or voltmeter to measure its voltage.
If the voltage is below the recommended level, it may need to be charged or replaced. Ensuring the battery terminals are clean and securely connected is also essential. By testing and maintaining the battery, you can ensure the reliable starting of your generator when you need it most.
Regularly checking and testing your generator’s battery is crucial for proper functioning.
Check the fuel filter/water separator
Check the fuel filter and water separator as part of your troubleshooting steps if your generator won’t start. A clogged or dirty fuel filter can prevent fuel from reaching the engine. At the same time, a water separator helps remove any fuel moisture that could be causing issues.
By inspecting these components, you can ensure that clean and proper fuel is delivered to the engine, increasing your chances of getting your generator up and running again.
Verify the spark plugs/glow plugs are working
Check the spark plugs or glow plugs to ensure they are functioning properly. Defective spark plugs can prevent the generator from starting, so inspecting them for any signs of damage or wear is important.
If necessary, replace them with new ones. Similarly, if you have a diesel generator, make sure the glow plugs are in good condition and provide sufficient heat for ignition. By verifying the functionality of these essential components, you can troubleshoot and address any issues preventing your generator from starting efficiently.
Clean the air filter
Cleaning the air filter is another important step in troubleshooting a generator that won’t start. Over time, dust and debris can build up on the air filter, restricting airflow and affecting the engine’s performance.
Removing and cleaning the air filter regularly ensures that it remains free from dirt and clogs. This will help maintain optimal airflow to the engine, improving combustion and increasing the chances of your generator starting successfully.
So make sure to include cleaning the air filter in your maintenance routine to keep your generator running smoothly.
Maintenance Schedule
Proper maintenance is crucial to ensure that your generator starts when you need it most. Regularly inspecting and maintaining your generator can help prevent issues that may cause it not to start.
This includes checking the fuel level and valve, cleaning the carburetor, testing the battery, and verifying that the spark plugs are working properly. Additionally, clean the air filter regularly to keep it free from dirt and debris.
| Interval | Essential Tasks | Advanced Maintenance |
|---|---|---|
| Monthly | Test start, check oil, inspect filters | Clean exterior, check battery |
| Quarterly | Change oil, clean spark plug | Test safety systems, fuel filter check |
| Yearly | Replace filters, rebuild carburetor | Valve adjustment, full tune-up |
Storage Best Practices
Proper storage significantly impacts starting reliability. Keep your generator in a clean, dry space between 40-80°F. Use a breathable cover and elevate the unit off concrete floors to prevent moisture damage.
Additional Tips for Generator Startup
To ensure your generator starts up smoothly, keep the fuel fresh and not let it become stale.
Ensure fuel is fresh and not stale
To ensure your generator starts smoothly, it is crucial to use fresh fuel. Stale gasoline can cause various issues, including clogged carburetors and fuel lines. Always check the expiration date on your fuel containers and avoid using old or contaminated fuel.
Using fresh fuel will help maintain optimal performance and reliability in your generator.
Use a fuel stabilizer
Using a fuel stabilizer is essential for keeping your generator running smoothly. It helps to prevent the fuel from breaking down and becoming stale, which can clog the carburetor and make it difficult to start the generator.
By adding a fuel stabilizer to your gas tank, you can prolong the life of your generator and ensure that it starts up easily whenever you need it. So don’t forget to use a fuel stabilizer as part of your regular maintenance routine!
Keep the generator in a well-ventilated area
To ensure proper functioning and safety, keeping your generator in a well-ventilated area is important. This means placing it in a location with adequate air circulation to prevent the buildup of exhaust fumes.
Generators produce carbon monoxide, a highly toxic gas that can be deadly if inhaled. Keeping your generator in a well-ventilated area can effectively dissipate these harmful fumes and reduce the risk of carbon monoxide poisoning.
Never run your generator indoors or in enclosed spaces like a garage or shed. Instead, position it outside at least 20 feet away from windows, doors, and vents to protect you and others from potential harm.
In addition to ventilation, regular maintenance of your generator is essential for optimal performance. This includes cleaning or replacing the air filter as needed to ensure proper air intake and fuel efficiency.
Check for mechanical issues
To troubleshoot a generator that won’t start, it’s important to also check for any mechanical issues. Look for any visible damage or loose connections, such as frayed wires or broken parts.
Inspect the recoil starter mechanism to ensure it’s functioning properly and not blocked by debris. If you suspect an issue with the ignition coil, have it tested or replaced if necessary.
Additionally, ensure all engine components are securely fastened and in good condition to avoid any potential mechanical problems that may prevent your generator from starting.
Regularly inspect and maintain the generator
To keep your generator running smoothly and prevent any issues, it is important to regularly inspect and maintain it. By conducting routine checks, you can identify potential problems before they become major.
Inspect the fuel lines for leaks or blockages, check the oil levels to ensure they are sufficient, and inspect the spark plug for signs of wear or damage. Additionally, clean or replace the air filter as needed and test the battery to ensure it has enough charge.
Regular maintenance will help prolong the lifespan of your generator and ensure that it starts when you need it most.
Conclusion
A generator not starting can be frustrating. Still, you can often fix the issue with some troubleshooting and maintenance. You can get your generator up and running again by checking common problems like low fuel levels, clogged carburetors or air filters, and faulty spark plugs or batteries.
Always follow proper maintenance procedures and keep your generator in good working condition to prevent future startup issues.
FAQs
What are some common reasons why a generator won’t start?
There are several common reasons why a generator may fail to start, including:
- Low oil level.
- Out of gas.
- Choke lever in the incorrect position.
- Closed or clogged fuel valve.
- Clogged or air-locked carburetor.
- Faulty spark plug.
- Tripped low-oil sensor.
- Dead battery.
How can a faulty spark plug prevent a generator from starting?
A faulty spark plug can prevent a gas-powered generator from starting because it is responsible for igniting the fuel and air mixture inside the engine cylinder. If the spark plug is damaged or worn out, it may not produce a strong enough spark to ignite the fuel, resulting in a lack of power and preventing the generator from starting properly.
What should I do if my generator has a dead battery?
If your generator has a dead battery and isn’t responding when you try to turn it on, you should:
- Test the battery using a multimeter to confirm it is dead.
- Try jump-starting the generator with another battery.
- Take safety precautions when working with batteries, such as wearing gloves and safety glasses.
A dead battery can prevent the generator from starting or cause it to start and then shut off quickly.
What steps should I take to troubleshoot a generator that won’t start?
To troubleshoot a generator that won’t start, follow these steps:
- Check the fuel level and ensure the fuel valve is open.
- Inspect and clean the carburetor to remove any blockages that may be preventing fuel flow to the engine.
- Test the battery’s voltage and check its connections.
- Examine the spark plug for damage or wear and replace it if necessary.
- Verify that the choke lever is in the correct position.
- Ensure the low-oil sensor hasn’t been tripped due to low oil levels.
By systematically checking these components, you can identify and resolve the issue preventing your generator from starting.
What’s the first thing I should check when my generator won’t start?
Check fuel level and quality first – make sure you have fresh fuel less than 2 months old. Verify the oil level is correct using the dipstick. Make sure no electrical devices are plugged in before starting.
Why does my generator turn over but not start?
Check if the choke lever position matches the engine temperature. For cold starts, close the choke completely. For warm engines, keep it partially or fully open. Verify the fuel valve is in the open position.
What’s causing my generator’s electrical problems?
If completely silent, check the battery voltage (should be above 12 volts) and clean the terminals. For clicking sounds, test battery connections. When the power output is low, inspect the spark plug condition.
What should I do if my generator starts then immediately dies?
This typically indicates a fuel delivery problem. Check for clogged fuel filters or lines. Verify the fuel cap vent isn’t blocked. Make sure the carburetor bowl is clean and free of old fuel deposits.
Why won’t my generator start in cold weather?
Cold temperatures can cause oil to thicken and batteries to drain faster. Use winter-grade oil and keep the battery charged. Consider using a battery warmer or storing the generator in a sheltered area in extreme cold.
What’s the safest way to operate my generator?
Place it 20 feet from buildings on dry, level ground. Never run it indoors or near windows. Keep 3-4 feet clearance around the unit. Install carbon monoxide alarms and move to fresh air if you feel dizzy.
What essential maintenance prevents starting problems?
Change oil every 100 hours or annually. Clean air filters monthly and replace them as needed. Use fresh fuel with stabilizer for storage. Test-run monthly for 30 minutes. Keep the battery charged and terminals clean.
How should I prepare my generator for long-term storage?
Drain the fuel system or add a stabilizer to fresh fuel. Change oil while warm. Remove the battery or connect it to the maintainer. Store in a clean, dry place. For seasonal storage, perform full maintenance check before storm seasons.
How can I protect my generator from weather damage?
Use a manufacturer-approved generator tent or canopy. Never operate in standing water or direct rain. Keep the generator elevated on a dry surface. Avoid touching with wet hands.
When should I call a professional?
Contact a technician if you hear knocking sounds, see metal shavings in the oil, or if basic troubleshooting fails. Seek immediate help for burning smells, excessive smoke, or serious error codes.
How do I safely refuel during operation?
Turn off the generator and let it cool for 10 minutes. Use fresh fuel from approved containers. Avoid spills on hot engine parts. Never refuel while running or hot.
Why does my generator run rough after starting?
The most common causes include stale fuel, dirty carburetor, or improper choke position. Start with fresh fuel and proper warm-up before connecting loads.
What’s the best fuel for reliable starting?
Use fresh unleaded gasoline with 87 octane or higher. Avoid fuel containing more than 10% ethanol. Add fuel stabilizer when storing longer than 30 days.
How long should I warm up my generator?
Allow 3-5 minutes warm-up time in warm weather and 5-10 minutes in cold conditions. This ensures proper oil circulation and stable operation.
Let me analyze the gaps in the original article and create supplementary FAQs that provide new value:
What’s the difference between a flooded and an engine that’s not getting enough fuel?
A flooded engine has too much fuel in the combustion chamber, while a fuel-starved engine isn’t getting enough fuel. The symptoms are similar (won’t start), but the solutions are opposite – wait and drain excess fuel for flooding, versus priming the fuel system for starvation.
How do I know if my generator’s automatic voltage regulator (AVR) is failing?
Look for signs like flickering lights, inconsistent power output, or voltage readings outside the normal range. A failing AVR can prevent proper startup or cause the generator to run erratically.
What role does altitude play in generator starting problems?
Higher altitudes affect air-fuel mixture because of lower oxygen levels. Above 3,000 feet, you may need to adjust the carburetor jetting or fuel mixture to compensate for the thinner air.
Can weather conditions affect my generator’s starting ability?
Extreme temperatures impact starting reliability. Cold weather thickens oil and reduces battery capacity, while hot weather can cause vapor lock in fuel lines. Each condition requires different starting techniques.
What’s the proper break-in procedure for a new generator?
Run the generator at 50% load for the first 5 hours, varying the load periodically. This helps seat piston rings properly and ensures long-term reliability. Skipping proper break-in can lead to starting issues later.
Why does my generator start but immediately die?
This often indicates a fuel delivery problem different from complete failure to start. Check for partially clogged fuel lines, a sticking float in the carburetor, or a failing fuel pump that can’t maintain consistent flow.
 Portable Generators, Understanding and Repairing…
 The 19 Basic Faults of Portable Generators and How…
 Aurora’s Echo Portable Frequency Generator | 528…
 Solar Generator,Portable Generator,Solar Power…
 Aynaxcol Assembled Cylinder Head Kit, Replacement…

Leave a Reply